


Hello Everyone, I wanted to share this tutorial with you. If you want to know more about the designer and other services, page kits or classes they may offer please visit their blog, store or web site. Enjoy!
Check out Roree Rumph's Life is Good mini album, you'll be amazed.


Instructions:
Cover
1. Paint the chipboard cover with off-white acrylic paint, multiple coats, and let dry.
2. Hand stitch each plank on the chipboard cover with off-white embroidery thread.
3. Adhere the cardstock sticker for the title to the chipboard cover with 3-d foam adhesive.
4. Cut out flowers and leaf shapes from patterned paper, and distress the edges with a file. Layer the leaf shapes, flowers, and buttons, and adhere the flowers to the chipboard cover.
5. Punch two holes on the right plank of the chipboard cover. Thread ribbon through the holes, then thread again, and knot and trim each end.

Page 1
1. Cover the chipboard page with patterned paper, and distress the edges with a file.
2. Apply the cardstock and letter stickers to the page.
3. Cut out two cloud shapes from patterned paper. Hand stitch both shapes with off-white embroidery thread. Layer and adhere the clouds to the page.
4. Cover the chipboard heart with patterned paper, add a cross stitch with blue embroidery thread, and adhere the heart to the page.


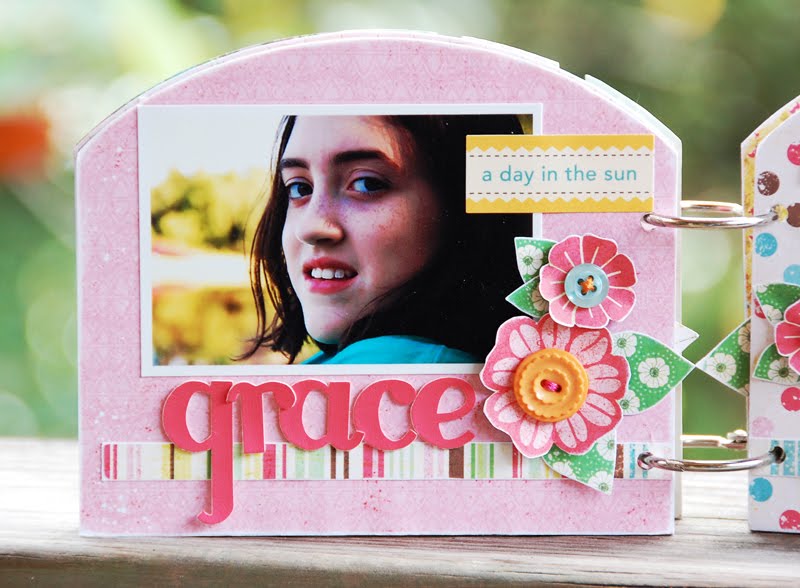


Pages 2-7
1. Cover the chipboard page with patterned paper, and distress the edges with a file.
2. Adhere 2 3/4 x 4" photo to the page.
3. Adhere a 5 3/4" strip of striped patterned paper to the page.
4. Adhere the cardstock and letter stickers to the page.
5. Cut out flowers and leaf shapes from patterned paper, and distress the edges with a file. Layer the leaf shapes, flowers, and buttons, and adhere the flowers to the page.
Assemble the album with binder rings.
Supply List:
Maya Road picket fence chipboard mini book
Echo Park Paper Life Is Good Collection, Floral Dress
Echo Park Paper Life Is Good Collection, Brown Floral
Echo Park Paper Life Is Good Collection, The Neighborhood
Echo Park Paper Life Is Good Collection, Simple Stripes
Echo Park Paper Life Is Good Collection, Bold Stripes
Echo Park Paper Life Is Good Collection, Seeing Spots
Echo Park Paper Life Is Good Collection, Set The Table
Echo Park Paper Life Is Good Collection, Happy Borders
Echo Park Paper Life Is Good Collection, Elements
Echo Park Paper Life Is Good Collection, Stickers
October Afternoon Fly A Kite Collection, Picnic Table
October Afternoon Fly A Kite Collection Word Stickers
Jenni Bowlin Collection, Vintage Style Sew-On Buttons, Orange
American Crafts Thickers, Poolside Grapefruit
American Crafts Thickers, Poolside Blue
Thanks so much Roree.

No comments:
Post a Comment