CLICK HERE FOR FREE BLOGGER TEMPLATES, LINK BUTTONS AND MORE! »

About the Celebrating Ordinary Moments Blog

Mission Statement
Thank you for checking out my blog. I started this blog to create a place where people are able to find inspiration and share ideas. I find myself surfing the web looking for inspiration that is unique and different. If I find an interesting tutorial I'll share it with you. I will include a "live" link back to the original blog, store or web site so that you may have the option to visit and learn more about the designer and other services, class or kits they may offer. By posting tutorials I am hoping to help inspire people that are interested in creating something fresh and new.


Terms of Use for my Personal Designs or Patterns.
When listing completed projects on eBay, blogs, etsy, facebook, personal websites, forums or online venues, or if using these patterns for a project submitted to magazines or other publications, it is required that credit be given to Corrine Paul in a reasonably visible way. Example; “Pattern used from Corrine Paul http://celebratingordinarymoments.blogspot.com/."

Thursday, December 30, 2010

Christmas 6 x 6 Recipe Album Tutorial

Hello Everyone, I wanted to share this tutorial with you. If you want to know more about the designer and other services, page kits or classes they may offer please visit their blog, store or web site. Enjoy!

http://dianesdesigns.blogspot.com/2009/08/hearts-go-home-for-christmas-6-x-6.html

Recipes will be family favorites, ones I've enjoyed or ones that just look simply wonderful. I'm looking for recipes that can be easily made, but that tastes like they took all day! I have appetizers, beverages, salads, veggies...well, enough recipes for several full course meals!


These two pages (above/below) use a retired stamp set (Espressoly for You), but it seemed to perfectly fit the recipes. Because I have several demonstrators taking my classes, I knew some might prefer Stampin' Up! only products, so I created an alternative design for them.


The following two pages are the Stampin' Up! only versions. The mug is made using a tag punch!

I absolutely love Wassail. I think it tastes very healthy. Just thinking about is making my mouth water!


The first time I had this salad was at my grandmother's on Christmas day many years ago. It was so yummy...I couldn't decide if it was a salad or a dessert! You decide.


Who doesn't need some great recipes to jazz up the left over Christmas turkey. But I rarely fix turkey for Christmas. So I've included other favorite recipes for meats. Just thought for those who do fix a turkey, this recipe might come in handy.


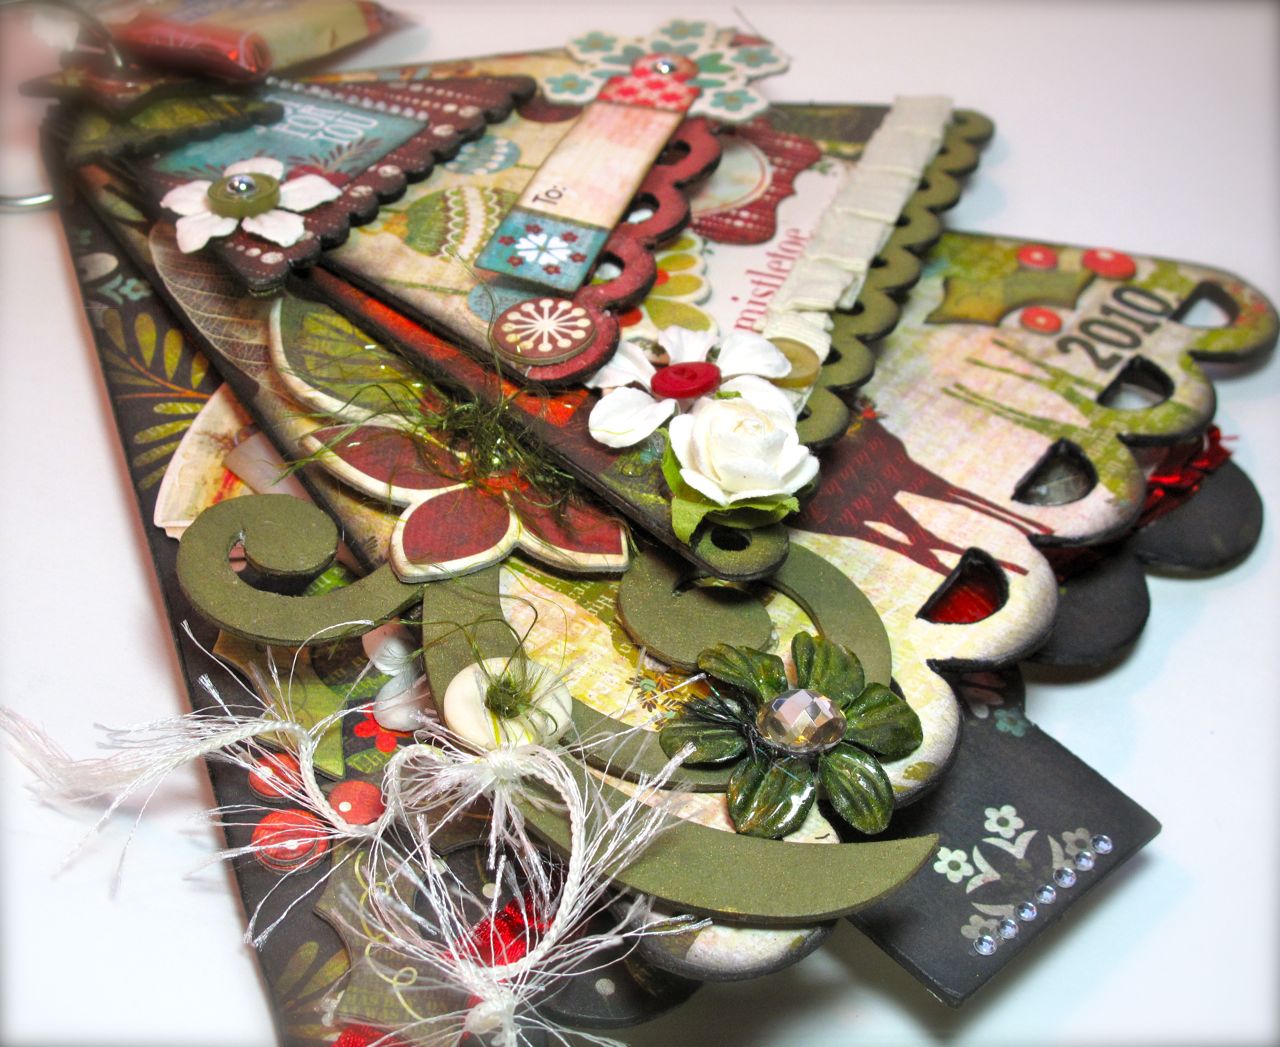
I'm still taking photos of cards...but hope you enjoyed a peek (didn't post them all!) into my most recent class. Their pages were beautiful! It's going to be a stunning gift or Christmas treasure.

Thanks for stopping in.

Country Christmas Card

Hello Everyone, I wanted to share this with you. If you want to know more about the designer and other services, page kits or classes they may offer please visit their blog, store or web site. Enjoy!

http://creativedaze.wordpress.com/

Creative Tips:

1. Are you without Christmas Designer Paper? No problem, think outside the box and use something from your stash. The tree is wearing Love Note DP mounted on a background found in the Play Date DP pack. Nothing like a traditional green and red for the holidays!

2. The Victoria Crochet Trim adds a sweet country look to any Christmas card.

3. The Finial Press Embossing Folder added the perfect finishing touch to the card. Doesn’t it look like an embroidered quilt in the background?

4. How about a matching tag? Isn’t the miniature tree the cutest? My favorite is the Eyelet lace skirt on the tag.

Card Recipe:
Stamps: Many Merry Messages (116586)
Paper: Very Vanilla (101650), Riding Hood Red (111348), Pear Pizzazz (119795), Early Expresso (119686), Love Letter DP (117162), Play Date DP (117168)
Ink: Pear Pizzazz (119784), Early Expresso (119670), Early Expresso Stampin’ Write Marker (119680)
Accessories: Linen Thread (104199), Victoria Crochet Trim (118481), Very Vanilla Taffeta (109071), Finial Press Embossing Folder (115963), Big Shot (113439), Eyelet Border (119853) and Scallop Square (119884) Punches, Stamping Sponges (101610), Dimensionals (104430), Glue Dots (103683), Sticky Tape (104294)

Jillibean Soup Christmas Mini Album Tutorial

Hello Everyone, I wanted to share this tutorial with you. If you want to know more about the designer and other services, page kits or classes they may offer please visit their blog, store or web site. Enjoy!

http://jillibeansoup.typepad.com/my_weblog/tutorials/

We have seen some great projects here on the blog that repurpose the chipboard backing of the new corrugated shapes and sugar picks. Today I am going to show you how I made this Christmas mini album re-using that same packaging.

Picture 1

One of my favorite things about Jillibean Soup products is that you can mix and match old and new lines beautifully. For this mini I had a lot of fun doing just that. I have a mix of the new Christmas Chestnut Soup, Monster Stew, Grandma’s Christmas Soup and Old World Cabbage Stew and they are all perfect for this little Christmas book.

Gather up your favorite Jillibean papers, punches, trimmer, adhesive, ink and scissors and anything else you might want to add to spruce up your pages. I used lots of corrugated stars, sugar picks, alphas, bean stalks (especially the brown, red and green twine), journaling sprouts, bean seeds and shipping tags. I printed my pictures wallet-sized so that I could fit more than one on a page.

Picture 2

Now, since one of the reasons I created this mini was to show you how to repurpose the oh-so-cute packaging from the new corrugated shapes and sugar picks, go ahead and pull those out and the trim the tabs off so that you have only the flower shape.

Picture 3
Picture 4

Don’t worry if you don’t have enough of the packaging to make your entire album, simply use one of the flowers as a template to make more pages.

Picture 5

I used the large flowers for the pages in my album but you could also use the smaller ones. I used a small one for an accent in my mini:

Picture 6

Go ahead and cut out all of the pages you’ll need for your book and cover the chipboard packaging with patterned paper as well and then you can start adding your pictures and other embellishments until it’s just the way you want it. I kept the page designs relatively simple but you can go fancy if you’d like. Here is a look at my finished pages:

Picture 7

Picture 8

Picture 9

Picture 10

Picture 11

Picture 12

Picture 13

Picture 14

Picture 15

Picture 16

Kaisercraft Stocking Garland Stocking Mini Album Tutorial

Hello Everyone, I wanted to share this tutorial with you. If you want to know more about the designer and other services, page kits or classes they may offer please visit their blog, store or web site. Enjoy!

Kerryn : I love the new Kaisercraft Stocking Garland but really lack a suitable place to display it. When I had another look at it though, I realised it would make a great mini album. I have taken out one of the stockings so that it wasn’t too thick for the album rings and have only used a cuff on the front and back of the album.

The Be Merry collection was perfect for these photos of my daughter’s first Christmas.

I kept the embellishments to a minimum and have included plenty of journalling.

Mini albums are a great way of capturing those precious memories that enables you to use lots of photos to tell the story.

“Stocking Mini Album” by Kerryn Lawson

Products Used : Be Merry paper collection – Happy (P560), Cheer (P558), Joy (P556) and Delight (P561), Be Merry diecut elements (DC325), Be Merry black rubons (RB875), Be Merry colour rubons (RB876), Be Merry 6×6 paper pad (PP829), Be Merry Bliss Specialty Paper (PS114), Be Merry Chipboard (CB114), Lace – Natural (EM928), Rhinestones – Red (SB711), Stocking Garland (SB2082), Album Rings – Dark Brown (M019), Mini Alphas – Cherry Red (MA508), Clear Stamps – Dated (CS724).

Other products Used : Martha Stewart punch, Stampin’ Up punch, String

******************************************************

LG: Like Kerryn, I thought that the Stocking Garland would make a perfect Mini Album for some photos that my family took last Christmas. Our christmas color theme was almost the same colour as the ‘Tis the Season line so I decided to work with that.

I just love the vintage feel of the ‘Tis the Season collection. I added a lot of crackle paint on this project to add texture.

Here are the inside pages of my mini album:

“Stocking Garland Mini Album” BTP by LG Belarmino – Stocking Garland (SB2082). ‘Tis the Season’ Collection: Patterned papers, 6×6 paper pad (PP830), Mini Journal Tags (JT606), Printed chipboard (CB115), Die cut elements (DC326), Rub ons (RB877). Mini Alphas (MA508). Organza ribbon (RI616). Pearl Brad (EM933). Others: Crackle paint

Friday, December 24, 2010

Happy Holidays Basic Grey Mini Album Tutorial

Hello Everyone, I wanted to share this tutorial with you. If you want to know more about the designer and other services, page kits or classes they may offer please visit their blog, store or web site. Enjoy!

http://withagrin.blogspot.com/2010/12/happy-holidays-basic-grey-mini-album-bm.html


A Holiday Gift
"What I love about you" Christmas Tree Mini Album Gift

******

Hi Everyone! Happy Holidays to all you beautiful talented scrappers~

Ok.. I have to say, during the holidays I go happy-crazy trying to fit in all the things I WANT to do along with things I HAVE to get done... AND I LOVE IT! Ta-hee. At the top of my wish list this year was to find time to make a couple of gifts for my family & friends... and yay.. with the help of a super cute Maya Road chipboard mini album and the amazing Gorgeous Jovial Holiday paper collection from Basic Grey... I was able to make 'Snappy-Gift-Making-Magic'! Visit BlueMoon Scrapbooking today and make YOUR magical gifts and treasures!!!

A Christmas Tree shaped album with bold prints, fun holiday scrappy embellies (BG chipboard, ribbons, flowers, oh my!) .. I'm thrilled how easy, fast and fun this little keepsake mini was to create! It will be filled with special handwritten notes on all the pages, a Ghiradelli chocolate on first page and a fun gift card will be waiting on the last page! Another super fun project that I'm thrilled to give as a holiday gift :)

* A Gift of Christmas Tree Magic *

* Layering the tree *

* details that catch the eye *

* Magical *

* Naughty or Nice *

* Peace & Love + gift card *


* Holly Jolly back cover *

And from my scrappy heart to yours...
"May you and yours have a beautiful, safe and healthy holiday season filled with everything that is perfect!"

~With a Holly-Jolly Grin,
xoxo Steff

Tinsel & Twig by Girls Paperie Merry Christmas Mini Album Tutorial

Hello Everyone, I wanted to share this tutorial with you. If you want to know more about the designer and other services, page kits or classes they may offer please visit their blog, store or web site. Enjoy!


This book measures 5 3/4 x 9 1/2 and comes with a star, stocking, christmas ornament, 2 tags, and 2 presents. The traditional holiday prints, embellishments, and sticker sheets from the Tinsel & Twig collection from Girls Paperie was perfect for this book.

IMG_2974 (Small)
IMG_2976 (Small)

IMG_2978 (Large)
(click on picture for larger view)

Stocking (Small)
And here is a small look at the two page layout....

IMG_2981 (Small)
Are you as excited as I am! Enjoy! Julie

PaisleyandPolkaDots.com

Wednesday, December 1, 2010

I Wish Mini Scrapbook Album

Hello Everyone, I wanted to share this tutorial with you. If you want to know more about the designer and other services, page kits or classes they may offer please visit their blog, store or web site. Enjoy!

http://andreawalford.com/i-wish-mini-scrapbook-album-class

The first of every month marks the release of my new class planner and stamp class by email for that month. For the month of December, I’m really excited to be able to offer you this "I Wish" Mini Scrapbook Album Class. As a Stampin’ Up! Demonstrator, I find that this is the perfect time of year to offer a scrapbooking class because everyone is looking for affordable, yet unique Christmas ideas for all those hard-to-shop for people in our lives – parents, grandparents, long-distance relatives. Who wouldn’t love this little album filled with the gift of memories?

The idea for this class came when I saw the popular flip book – I loved the concept of a small, portable scrapbook album – but at the same time wanted one that could fit LOTS of pictures, more than the flip book allows. So, after much experimentation I came up with this album. Still created out of only 1/2 of a Simply Scrappin’ Kit, it will fit up to a whopping 13 pictures! Although this little album is Christmas-themed, it’s easily adaptable to any theme or occasion - keep the basic album construction and page layouts and simply change the Simply Scrappin’ Kit used. This makes it the perfect class for before OR after Christmas.